

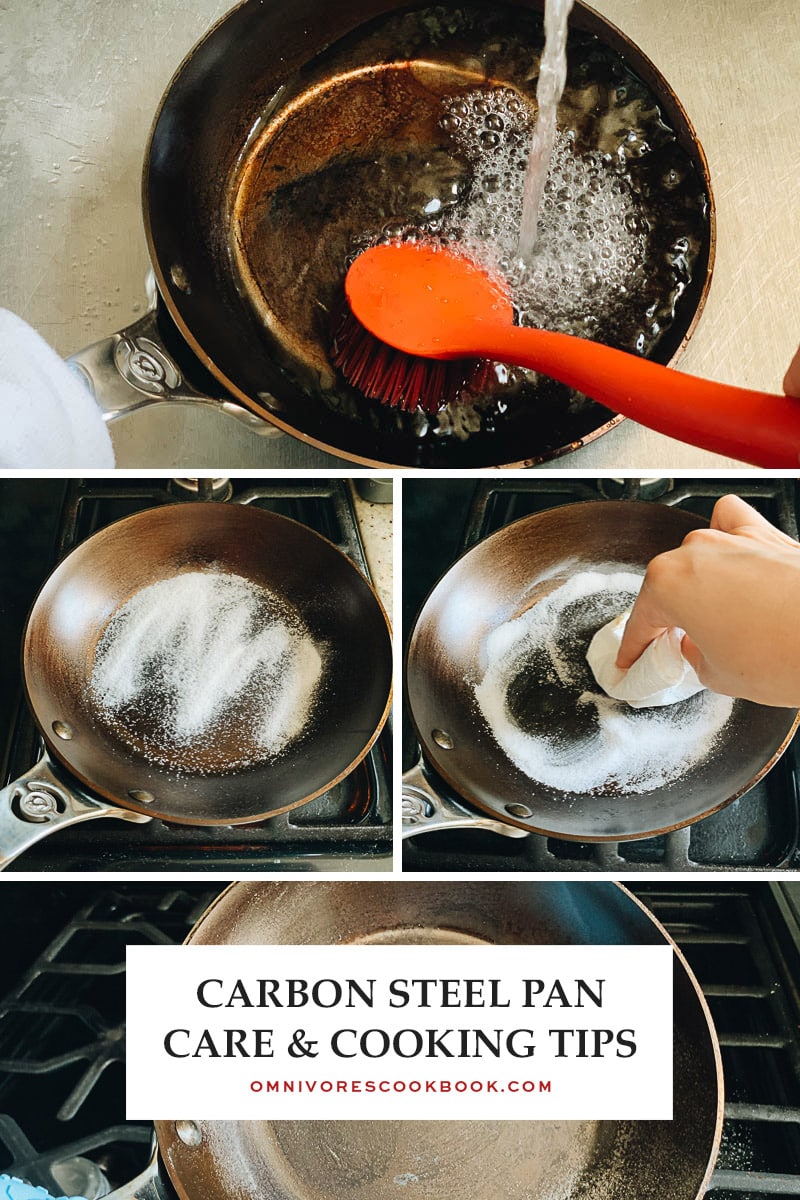
To remove sticky residue from non-stick pans, mix baking soda and water to create a paste and rub onto the affected area. Rinse with warm water and dry thoroughly.
Non-stick pans are a must-have in every kitchen for easy cooking and cleaning. However, over time, food spills and cooking oil can leave a sticky residue on the surface that can be difficult to remove. If not properly cleaned, this can not only ruin the non-stick coating but also make cooking less enjoyable.
Although there are many commercial products in the market that claim to effectively remove sticky residue, they can be expensive. Fortunately, you can use simple household items to get rid of the sticky residue and restore your non-stick pan to its original state. In this article, we will provide easy and effective diy methods to remove sticky residue from non-stick pans.
Credit: omnivorescookbook.com
Step 1: Let The Pan Cool Down
Explanation Of Why It’S Important To Wait For The Pan To Cool Before Attempting To Clean It
Non-stick pans are a kitchen essential for many households, thanks to their ability to make cooking and cleaning a breeze. However, when things get sticky, they can be a pain to clean. It’s important to note that when cleaning a non-stick pan, you should always wait for the pan to cool completely before attempting to clean it.
Here’s why:
- Safety first: A hot pan can cause serious burns, so you should never attempt to clean it while it’s still hot.
- Prevent warping: Non-stick pans are designed to be heated over low to medium heat. If you attempt to clean the pan while it’s hot, it can warp and damage the coating, leading to uneven cooking in the future.
Tips On How To Safely Handle A Hot Pan
While it’s essential to let your non-stick pan cool down after cooking before attempting to clean it, there are some tips that you can use to safely handle a hot pan:
- Use oven mitts or pot holders: Never touch a hot pan with your bare hands. Instead, use oven mitts or pot holders to protect your hands from burns.
- Remove the pan from the heat source: If the pan is still on the stovetop, turn off the heat and remove the pan from the heat source.
- Let it cool: After removing the pan from the heat source, allow it to cool for at least 10-15 minutes before attempting to handle it further.
By following these tips and allowing your non-stick pan to cool completely before attempting to clean it, you’ll ensure the longevity of the pan and keep yourself safe from burns.
Step 2: Add Warm Water And Dish Soap
Explanation Of Why Warm Water And Dish Soap Are Effective For Cleaning Non-Stick Pans
Using warm water and dish soap is one of the most effective ways to remove sticky residue from non-stick pans. The following reasons explain why:
- Warm water can loosen the sticky substances, making them easier to remove from the pan’s surface.
- Dish soap acts as a natural solvent that dissolves the fats, oils, and greases that cause the stickiness. This means you can eliminate the residue without using harsh chemicals that can damage your pan.
- Dish soap is also effective in breaking the surface tension of the water, allowing it to penetrate the sticky residue and loosen it.
Tips On How Much Dish Soap And Water To Use
When cleaning your non-stick pan with warm water and dish soap, it is important to use the correct amount of both. Here are some tips to avoid under or overusing them:
- Aim to use a ratio of one part dish soap to two parts warm water. This will provide enough cleaning power to break down the stickiness without leaving any soap residue.
- Ensure that you use enough warm water to cover the sticky residue but not too much that the pan becomes difficult to handle.
- Use gentle pressure and a soft-bristled brush or sponge to scrub the residue, but avoid excessive scrubbing, which can harm the non-stick coating.
Warning Against Using Abrasive Sponges Or Brushes
One crucial point to remember when cleaning non-stick pans is to avoid using abrasive sponges or brushes. Here’s why:
- Abrasive sponges or brushes can cause damage to the delicate non-stick coating of your pan by leaving scratches, which can make the surface stickier in the long run.
- Harsh scrubbing can also wear out the coating and cause it to flake, which not only ruins your pan’s appearance but can also pose health risks if ingested.
Warm water and dish soap are the perfect pair to keep your non-stick pans free from sticky residue. By following the tips mentioned above, you can ensure your pans stay in tip-top condition and last for years to come. So, get ready to enjoy cooking with your non-stick pans like you never have before!
Step 3: Scrub Gently With A Soft Sponge
Explanation Of How To Choose The Right Sponge For Cleaning Non-Stick Pans
Choosing the right sponge is crucial to avoid damaging the non-stick coating of your pan. Make sure to select a soft sponge with a non-abrasive surface to gently remove any stubborn residue. Avoid using steel wool, rough-textured sponges, or abrasive cleaners, as they can scratch the surface and create permanent damage to the non-stick coating of your pan.
Tips On How To Scrub Gently To Avoid Scratching The Non-Stick Coating
When scrubbing your non-stick pan, use gentle circular motions to avoid scratching the surface. Start gently and slowly increase the pressure if the residue is stubborn, but never use excessive pressure or force. Scrub for a few minutes until the residue comes off, then rinse the pan in warm water.
If the residue is hard to remove, apply a mixture of baking soda and water to the area and let it sit for 10-15 minutes before scrubbing.
Here are some additional tips to keep in mind:
- Always use a mild dishwashing detergent and avoid high-alkaline or acidic cleaners.
- After cleaning, make sure to rinse the pan thoroughly with warm water and dry it immediately with a soft cloth or paper towel.
- Avoid using metal utensils on your non-stick pan, as they can scratch the surface and cause damage.
- Store your non-stick pans carefully, either stacked with other non-stick pans or hanging to avoid damage.
Reminder To Focus On Stubborn Gunk Areas
If there are any stubborn areas with gunk that is hard to remove, focus on that particular spot and scrub it gently. Do not use a lot of force as it will damage the non-stick coating. You can also try using a specialized non-stick cleaning solution or rubbing alcohol to remove the residue.
Remember to rinse and dry the pan thoroughly before using it again. Cleaning your non-stick pan regularly will extend its lifespan and ensure optimal performance over time.
Step 4: Rinse Thoroughly And Dry
Explanation Of Why It’S Important To Rinse The Pan Thoroughly
After scrubbing and soaking your non-stick pan to remove the sticky residue, it’s crucial to rinse it thoroughly to remove all traces of soap and cleaner. Failing to do so can result in a soapy residue build-up on the surface, and you’ll never truly get the pan clean.
Not to mention, the soap can leave a distasteful flavor on the next food you cook in the pan. That’s something you don’t want to happen.
Tips On How To Dry The Pan To Avoid Water Spots
Drying your non-stick pan is as important as cleaning it. If you don’t dry it thoroughly, water spots may appear, which isn’t great to look at, and it can be tough to remove them. Here are a few tips to ensure your pan is dry and ready to use:
- Use a clean, dry cloth or paper towel to wipe the pan after rinsing it.
- Ensure you dry all surfaces of the pan, including the exterior, handle and non-stick surface.
- If you want to speed up the drying process, place the pan over a low flame or heat for a minute or two.
- Never leave the pan to drip dry, as this can lead to water spots and residue build-up.
Step 5: Season The Pan
Explanation Of Why Seasoning A Non-Stick Pan Is Important
Seasoning a non-stick pan is crucial to prolong its lifespan. While non-stick pans are easy to use, over time, the coating can wear away due to the high heat used in cooking. Seasoning acts as a protective barrier, preventing the non-stick coating from sticking to food and ultimately extending the pan’s useful life.
It also improves the non-stick qualities of the pan, making it easier to cook food without sticking.
Tips On How To Season The Pan Properly
Follow these easy steps to season your non-stick pan correctly:
- Step 1: Clean your pan thoroughly with a mild dish soap and water, making sure all food residue and oils are removed.
- Step 2: Dry the pan completely with a clean towel.
- Step 3: Apply a small amount of vegetable oil evenly on the inside surface of the pan.
- Step 4: Preheat your oven at 350°f (175°c) and then place the pan on the center rack for 30 minutes.
- Step 5: Turn off the oven and allow the pan to cool down naturally before removing it from the oven.
Note: don’t use cooking spray to season the pan as it can leave a residue, which is challenging to remove and can damage the non-stick coating.
Now your pan is ready for use. You can repeat the seasoning process every few months to ensure optimal performance.
Remember, seasoning your non-stick pan isn’t a one-stop solution. It’s imperative to take good care of your pan to make it last longer. Follow the manufacturer’s instructions and use the pan with care to avoid any damage.
Happy Cooking!
Frequently Asked Questions For How To Remove Sticky Residue From Non-Stick Pans?
What Causes Sticky Residue On Non-Stick Pans?
Sticky residue is mainly caused by overheating oil or food in non-stick pans.
Can You Use Vinegar To Clean A Non-Stick Pan?
Yes, you can use vinegar to clean a non-stick pan. Mix equal parts of water and vinegar and boil the solution in the pan. Discard the liquid, then gently scrub the surface.
What Is The Best Way To Remove Burnt-On Residue?
Make a paste of baking soda and water. Spread it on the residue and let it sit for 30 minutes. Scrub the residue with a non-abrasive brush, then rinse with water.
Can I Use Steel Wool To Clean My Non-Stick Pan?
No, steel wool can damage the non-stick coating. Use a soft sponge or a non-abrasive brush to clean the pan.
How Can I Prevent Sticky Residue On My Non-Stick Pans?
Avoid overheating the pan, use the right utensils, clean the pan after every use, and apply a thin layer of oil before cooking.
Conclusion
With these simple tips, you can easily remove sticky residue from non-stick pans without any damage. From using baking soda and vinegar to salt and oil, these household items are all you need to get your pans looking as good as new.
Remember to avoid using harsh chemicals or abrasive materials as they can damage the non-stick coating. With a little bit of elbow grease and patience, you can conquer any stubborn residue that’s stuck on your pans. Regular maintenance and proper care can also prevent any future build-up, ensuring that your pans stay in top condition for years to come.
By following these steps, you can ensure that your non-stick pans remain a valuable and long-lasting investment.
Leave a Reply